
Break In Case Of Consultancy: Git, Version Control & Branching

Break In Case Of Consultancy is a series of articles designed to serve as emergency primers on a range of subjects that you'll likely be forced to brush up on at the last second - usually before a meeting or an engagement starts.
This one particular is everything you need to know to get through an engagement on or involving Git, version control, branching, commits and merges.
What Is Version Control?
In modern dev teams, there might be dozens or even hundreds of developers working on the same codebase.
That codebase will be stored in a central location somewhere in a repository. Some of those developers might even be working on the same exact file(s) within that repository.
How on earth are we meant to keep track of who did what?
Enter the idea of distributed version control and distributed version control systems, like Git and Mercurial.
The general concept of version control (sometimes also called revision control) is that it allows you to keep track of all the changes made to a set of files over time.
Version control systems also create a backup of the file every time a change is made, so you can revert to a previous version if something goes wrong.
With this essentially describing what a codebase is - a giant set of files that collectively make up an application - it's unsurprising that these version control systems are really, really useful when writing software.
What Is Git, And How Does It Work?

As briefly discussed, Git is a distributed version control system created by Linus Torvalds, most famous for creating the Linux operating system kernel. It certainly isn't the only one out there, but it is one of the most popular and it's the one you're most likely to bump into out in the wild.
Let's take a look at how it works:
Initial Repository Checkout
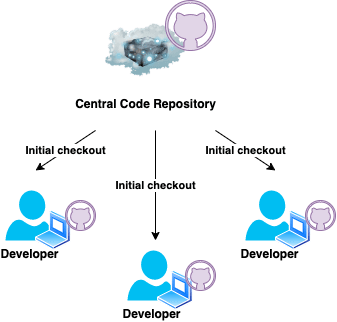
In most modern dev teams, there will be a central codebase or central repository, from which the working version of the application being built will be taken. When we're talking about the "main" codebase, or the "central repository", this is what we're talking about.
Let's say that we're using GitHub to store our central repository and thus Git will be our distributed version control system of choice.
In distributed version control systems like Git or Mercurial, each developer working on the central codebase will take their own copy of the entire central codebase and store it locally on their own machine.
This operation is called a checkout, and just refers to copying the contents of a remote repository (i.e the central repository) to a local machine.
At this point, each developer has a working copy of the central repository they're meant to be working on, and can get to work making changes.
You can also download a copy of almost any public repository on GitHub by performing a clone operation,
using the command git clone [full URL of GitHub repository you want to clone including https://].
This more or less does the exact same thing, downloading a complete working copy of the public repository.
Initializing The Repository & Adding files
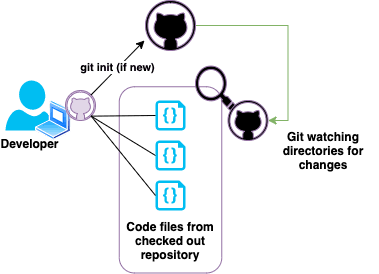
You don't need to initalize a repository that you've checked out from a remote Git server, but you do need to initialize a Git repository if you have code that already exists that you want to track with Git.
You do this by using the command git init in the command line, and then using the command git add .
What these commands do is tell Git to watch the repository and all the files in it for any changes that occur.
In Git, each file is always saved in one of three states:
- Modified: If you add, change, delete or move something within a file being watched by Git, it'll notice it, but Git hasn't been formally informed of those changes yet. The file is now in a modified state.
- Staged: This is you telling Git that you've changed a file and to take note of the change you made. At this point, your file is in a staged state.
- Committed: When you tell git to save those changes you've made to the files, the files are in a committed state.
You can check what state your repository files are in by using the git status command.
When you've made all the changes you want to for now and added the files (bringing them into the staged state), you're ready to make a commit.
Git Commits & SHA Hashes

A commit is essentially an instruction to Git to take a "snapshot" of your code in its current state, to fully save your changes and put the files you added into the committed state.
Commits aren't the actual data within the files you changed, but instead a record of changes made and saved to that version of the file, so we can keep track of the changes later on and revert back to a specific version if the situation needs it (which is version control in action!)
You can do a Git commit by using the command git commit -m [Commit Message]
I highly recommend being as descriptive as you can with these commit messages, because they mount up FAST if you're updating code a lot and just typing in gibberish will make it a nightmare to keep track of all your commits later on down the line.
If we use commit messages to keep track of commits, what does Git use to keep track of commits, then?
Git keeps tracks of all the different files by using a hashing function called SHA-1 to generate a short string of characters called a "hash".
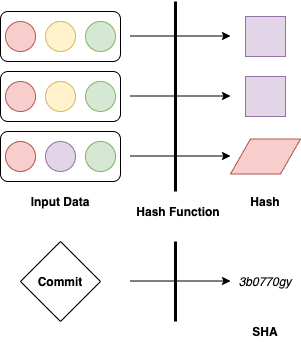
Hashing functions work by using a set of one-way cryptographic operations to take input data and output a unique single fixed-length value (the "hash"), regardless of how large the input data is.
Inputting the same exact input data will get you the exact same hash out the other end, but change even a character and you'll get a completely different hash.
We typically use hashes to detect whether changes have been made to files in transit (integrity), but Git primarily uses them as a unique reference mechanism to make sure the same data you put in is the same data you get back when you try to reference or revert back to it.
Git runs the commit (the commit referencing the changes made to the actual data) through the SHA1 hash function and generates a hash.
That hash is then associated with that specific commit and is used to reference things in Git, reset back to a specific commit and otherwise point to aspecific commit whenever the need arises.
SHAs will come up again soon when we look at Git branching.
Git Pushing to Remote Git/GitHub Repos
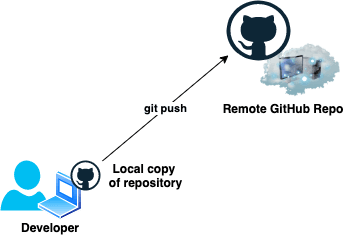
Onnce we've committed our changes, we need to get our code back into the remote repository/codebase we started with in the beginning of the article!
We do this by "pushing" or uploading our local repository content we downloaded when we checked out the codebase or cloned a remote repository.
The first thing you need to do to push your local content to the remote repository is to establish a link between you and the remote repository you want to push to.
You do this by using the git remote add origin [full URL of GitHub repository you want to push to including https://].
You will likely not get a response from this command, but if you've got functioning Internet connectivity, it should work out just fine!
The next thing you need to do is choose which Git branch you want to push your content to.
We'll get into branches and merges next, but for now just choose the "main" branch.
Git calls your default branch 'master' but most people call their working central repository 'main'.
Use the command git branch -M main to select the 'main' branch of the remote repository you just established a link to.
You can switch out 'main' for the name of any branch you want to push to, as long as it exists!
The last thing you need to do to push to GitHub is use the following command: git push -u origin main
This will push your local repository content over the Internet to GitHub, to the branch you selected in the repository you established a connection to.
Congrats! You've checked out or cloned a remote repository, made changes, committed them and now pushed those changes to GitHub!
Git Branches

When you create a Git repository, you already have a branch called master.
A lot of organizations will either use this master branch or rename it/create another branch called main. This is where the production-ready code that can be built into working software resides.
This example main Git branch is essentially made up right now of a series of commits, which you can see in the diagram above.
Everything is going swimmingly, until the application ends up with a particularly tricky bug that's going to take a while to fix.
Do we put the whole project on hold while one of our developers works on/fixes the bug?
Nope!
We can create a second branch that we'll call 'bugfix' and one developer can work on that while the rest carry on as normal.
We use the following command to tell Git to create our second 'bugfix' branch: git checkout -b bugfix.
Now our Git repository looks like this:
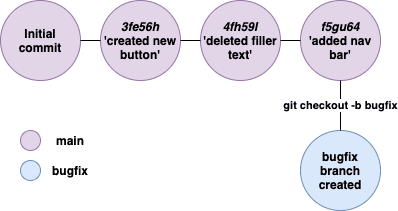
git checkout in this instance is what tells Git that we're about to switch to a different branch.11th
-b bugfix is what lets Git know we're going to create a new branch and call it 'bugfix'.
The bugfix branch is created as a copy of the main branch (or the branch the new branch came from) at the state of the last commit, in this case f5gu64 'added nav bar'
Let's say the developer working on fixing the bug makes some more changes and commits them to the bugfix branch.
At the same time, the rest of the team is making feature changes and updating the main branch the whole time.
Now, the Git repository looks like this:
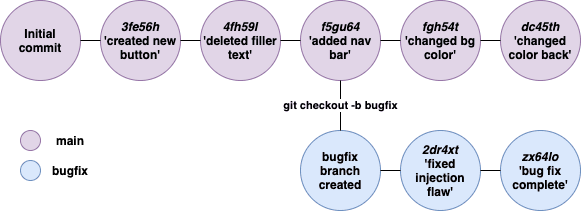
As you can see in the above diagram, the developer has now fixed the bug.
However, his branch bugfix doesn't have the
fgh54t 'changed bg color' or dc45th'changed color back' commits from the main branch..11th
We need to find a way of bringing the version of the code with the fixed bug into the production-ready main branch.
We do that via merging the two branches.
Merging Git Branches
From the bugfix branch, we first need to make sure our changes are all staged and committed before merging.
We went through how to git add and git commit earlier in the article.
We then run the following command: git checkout main to switch back to the main branch.
We don't need the -b here, because we're not creating a new branch and the main branch already exists.
From the main branch, we then run git merge bugfix to merge the changes from bugfix into the main branch.
At this point, we have merged the two branches and the Git repository looks like this:

Congrats, we created a branch and merged it back into main!
Pull Requests & Repository Forks
These are the last big Git concepts we'll look at in this article: pull requests and forking.
Pull Requests
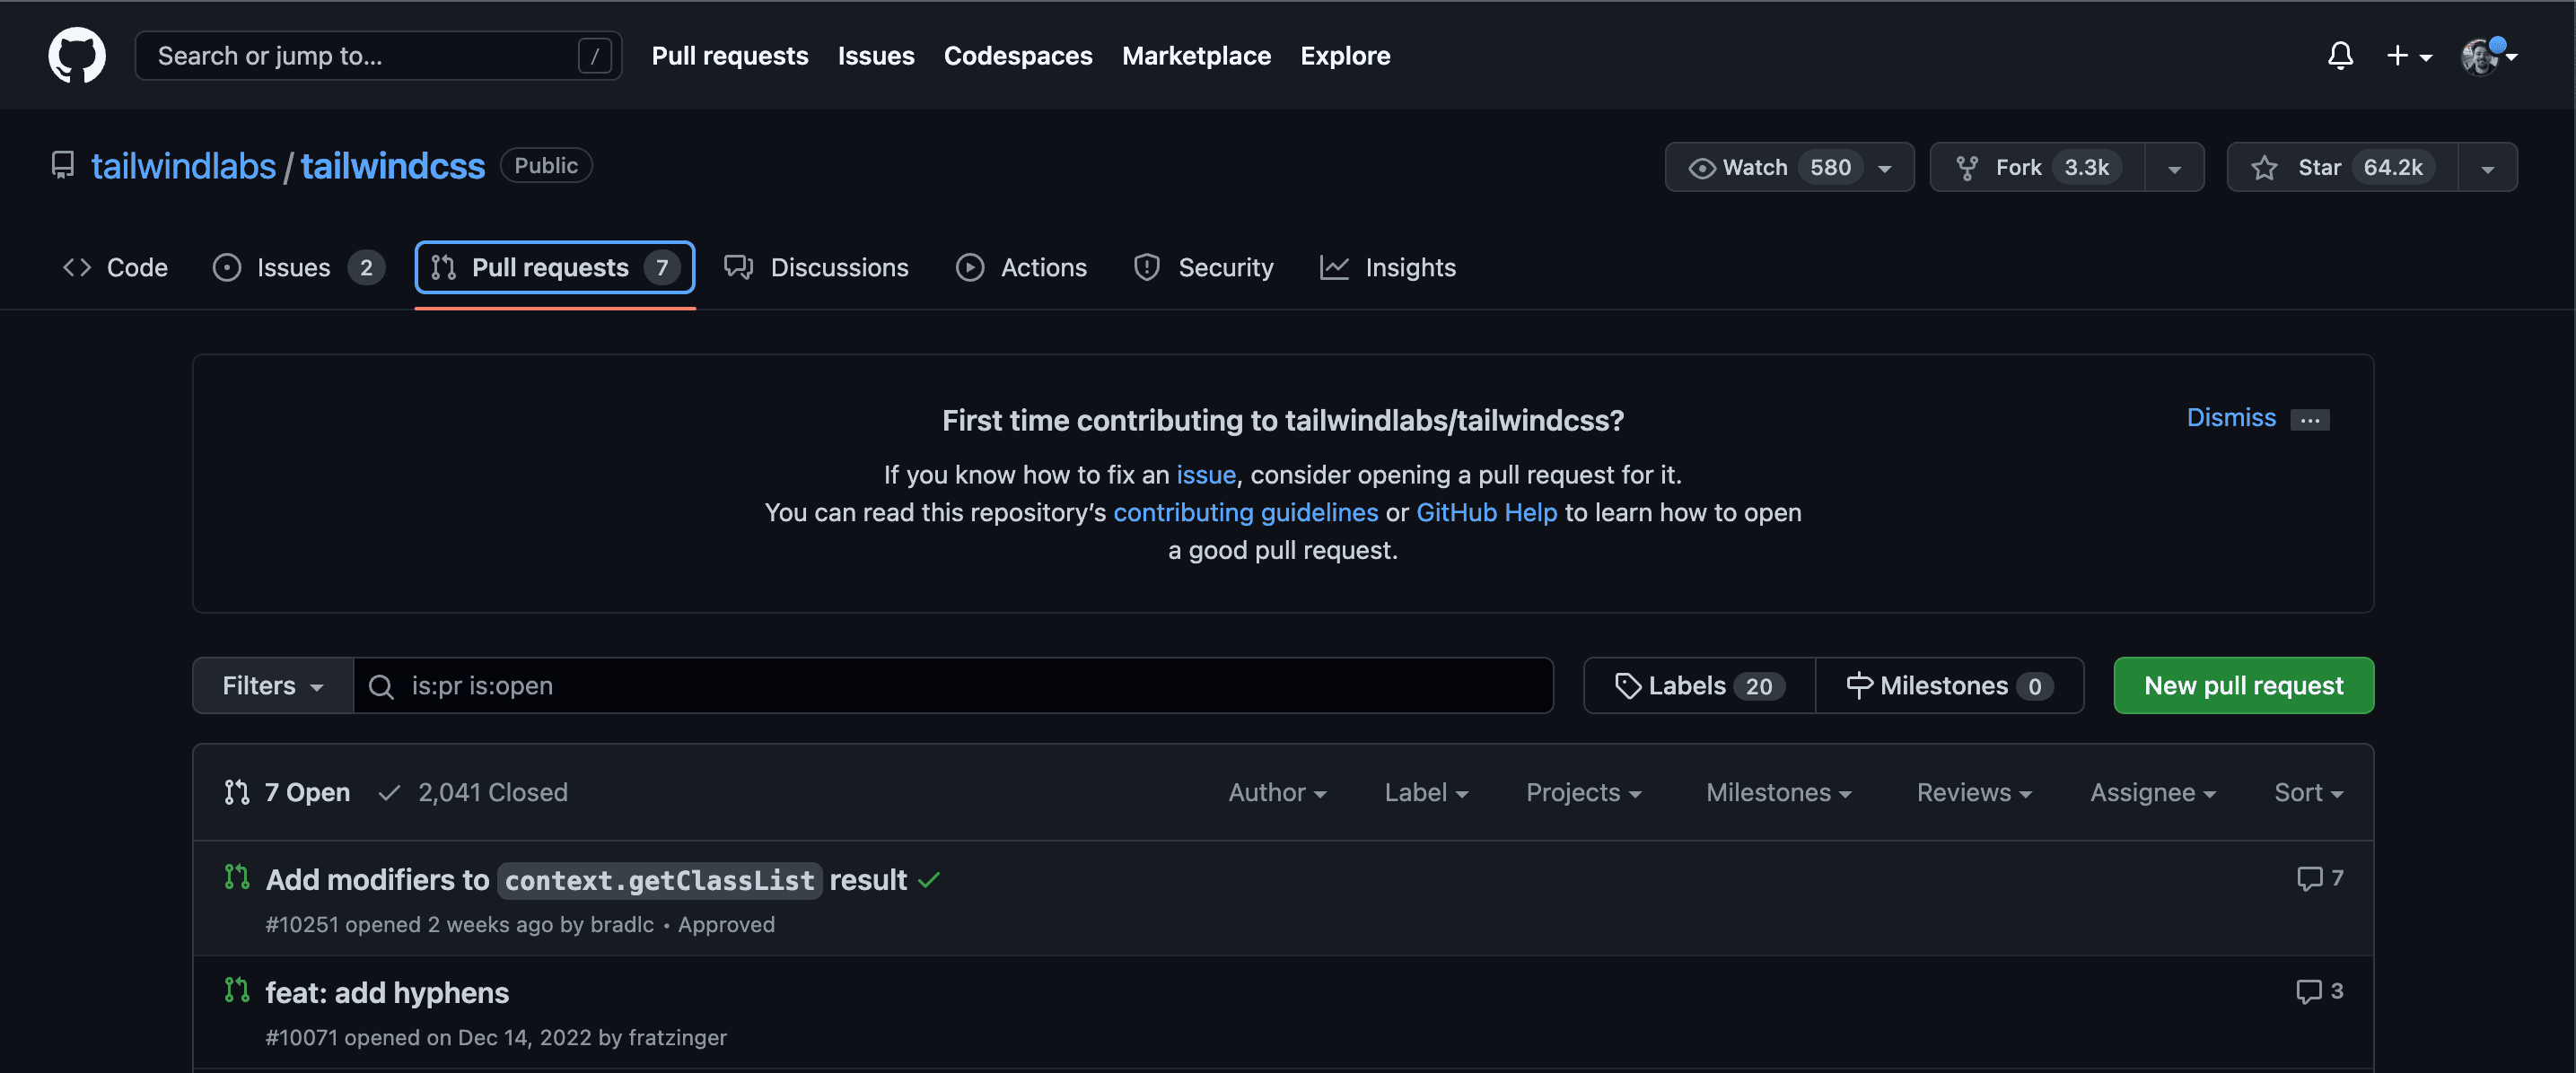
If you remember earlier in the article, we mentioned that you can git clone [URL] virtually any repository that's public on GitHub.
At that point, you've got a working copy of the repository on your local machine and you can make any changes you see fit.
Let's say that you think there's a bunch of buggy code that needs fixing, and that there needs to be a new feature you want.
So, in your cloned repository on your local machine - you successfully make all these changes, you test them and they work!
That's great - but your version of the repository isn't the same as the 'main' one you and everyone else downloaded.
If you want your changes integrated into the 'main' version of the repository you cloned, you'll need to submit a pull request.
Pull requests are ways to propose changes to a remote repository,
and are performed by using the following command in the GitHub CLI: gh pr create --title "The bug is fixed" --body "Everything works again, added new feature" --reviewer bee,puppycat
Alternatively, you can submit a pull request in the web browser, too:
First off, find the repository you want to fix an issue on. Click 'Create Pull Request'.
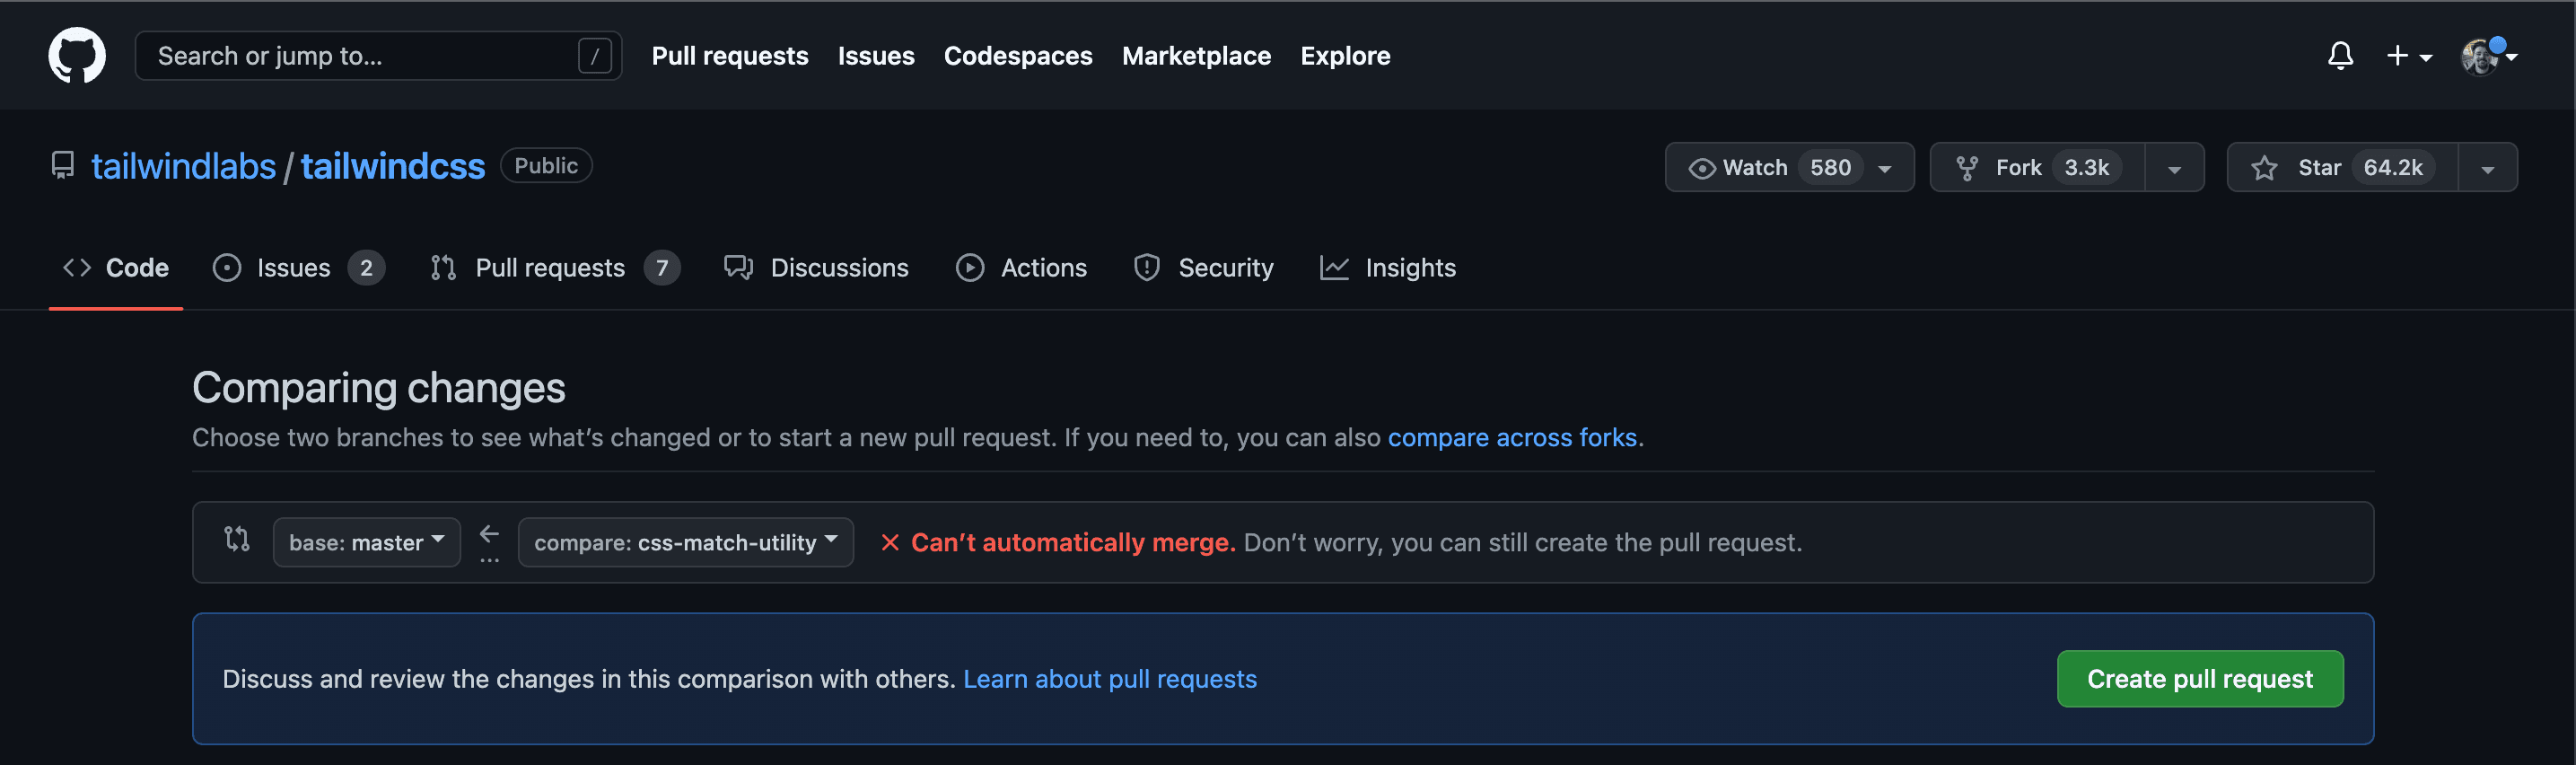
Then, select the branch you want to merge your changes to.

After that, add a title and body to your pull request and create it!
GitHub etiquette dictates that ideally, you should reach out somehow to the owner/group running the repository or project you want to contribute to with a pull request before submitting the pull request.
The owner of the repository or the collaborators can review the changes you propose in your pull request and if they want, accept or reject your pull request.
You don't want to work a bunch on your new feature and your bug fixes and then have them rejected, right?
This is why you reach out beforehand!
Forking repositories
Forking a repository is very similar in principle to cloning it, the main difference is how much control you want over the copied codebase.
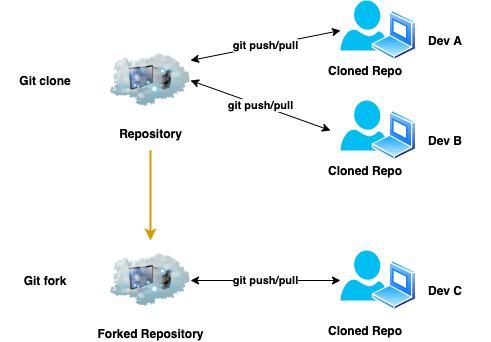
When you clone a repository, what you're doing is creating a linked copy of the repository that you're cloning.
Changes continue to be pushed to and pulled from the cloned repository, and any developer who has cloned a repository can synchronize themselves at any time with the cloned repository.
This will refresh their version of the cloned repository with all the changes made and integrated by other developers working on that repository.
When you fork a repository, what you're doing is creating an entirely independent copy of the repository you're forking.
If you fork a repository, you have complete control over the forked version of the repository.
Developers that contributed to the original repository will not know about the fork operation.
Unless you give them access there's no way for previous contributors to contribute to your forked repository, either.
You Git clone when you want to contribute to an existing project, and you Git fork when you want to create an entirely new, isolated project based on a publicly accessible Git repository.
Git Commands Cheat Sheet
git init : Initialize a new Git repository
git status : Check the status of the current repository
git add <file> : Stage changes to a file
git commit -m "message" : Commit changes to the repository with a message describing the changes
git log : View the commit history of the repository
git diff : View the differences between the current version of the files and the last commit
git branch : View the current branches in the repository
git branch <branch name> : Create a new branch with a specific name
git checkout <branch name> : Switch to a specific branch
git merge <branch name> : Merge changes from a specific branch into the current branch
git remote add origin <URL> : Add a remote repository to the current repository
git push -u origin <branch name> : Push changes to a specific branch in a remote repository
git pull : Retrieve changes from a remote repository and merge them with the local repository
git stash : Temporarily save changes that are not ready to be committed
git stash list : View the list of stashes in the repository
git stash apply : Apply a specific stash to the repository
TL;DR / In Conclusion
Git is a distributed version control system that has transformed how software is collaborated on, written and distributed.
Version control allows for multiple developers to work on the same file(s) and retain the ability to keep track of file versions and changes to files.
Code managed by Git is stored in a repository and can be made public or private in GitHub to control access/visibility.
Developers working on said code repository will copy down a working copy of a remote repository to their working machines by checking it out or cloning it.
At any time, the developer can pull in changes made by other developers to synchronize their working copy with the remote repository.
Developers making changes to files can git add their changed files to stage their changes, and git commit to save and commit their changes.
They can then git push those changes to the remote repository to copy their changes over.
Every repository has at least one branch, the main/master branch.
However, if required, separate copies of that branch can be created to work on specific features while not holding up/interfering with the main production-ready branch.
When finished, the separate branches can be merged back into main branch.
If you want to contribute to an existing project, you want to do a Git clone.
If you want to create an entirely new and independent project based from an existing publicly accessible repository, you want to do a Git fork.
Things to note as security consultants or interested parties (very similar to my DevOps advice):
- If you're consulting on or auditing a DevOps team or workflow and looking at Git repositories, be very considerate of time.
- These people are constantly operating at speed, every walkthrough you need to "get up to speed" is another hour they're falling behind.
- As always, study up on your clients beforehand as a mark of respect for their time, and to make your life easier.
- Due to the workloads and deadlines these teams are often under, auditors and consultants should look for documentation and written processes relating to code standards, pull requests and other Git operations we've talked about.
- There should be rules for making updates/changes/requests of a source code repository, and access should be controlled pretty tightly to those who need it. I.e. developers, reviewers and managers.
- After that, look at records of code respository commits, merges, etc. to the master/main branch.
- These should be coupled ideally with documented change records/requests in some sort of ticketing system like Jira or ServiceNow.
If you enjoyed this article, check out the other articles in the Break In Case Of Consultancy series:
- Break In Case Of Consultancy: DevOps Pipelines
- Break In Case Of Consultancy: Microservices & Containerization
- Break In Case Of Consultancy: Programming Languages for Non-Programmers